While fly tying as a hobby can be as involved as you want it to be, it doesn’t necessarily need to be so. I started tying flies, not as a hobby in and of itself, but as a means by which to save money. At the time, flies were mainly ordered through the mail and not so easy to come by, and I realized I could make them myself for approximately ¼ of what I could purchase them for.
Getting started fly tying will require a number of basic tools and materials. Listed below are some of the most important tools and materials, which can be purchased individually or in kits. This will allow you to get an idea of the cost of getting started in fly tying, before diving in. Note that if you know exactly what flies you want to tie, you can buy the materials individually, without having to buy more materials than you need (e.g. in a kit). However, most of the items below will come in a kit, should you choose to purchase one, and then you will have greater flexibility to tie other flies.
Getting started in fly tying does not require you to tie perfect flies, in the ideal proportions on superb equipment, to catch fish. I’m personally a mediocre tyer at best (after 15 or more years tying flies), and have caught countless trout on my own flies. Perhaps the reason I’m not a better fly tyer, is that the trout (at least on some streams) are not that demanding.
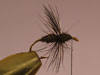
For example, the
Brook Trout so often found in The Great Smoky Mountains National Park are not as selective as trout in more fertile waters and they may succumb to a dry fly like this ant.
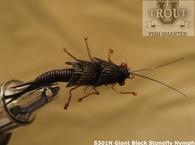
Note that, while you can catch some fish on generic and/or poorly tied flies, you will catch the most trout on realistically tied patterns imitating actual insects. This is especially true on some of the more fertile streams around the country, where trout can afford to be more selective. For this reason, I recommend our
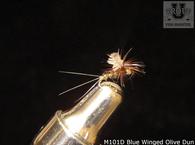
Perfect Fly brand of flies, which are the most realistic and true to life flies I've ever seen. Additionally, we have DVD's to help you tie the perfect
mayfly emergers, duns, and spinners and the perfect
mayfly nymphs.
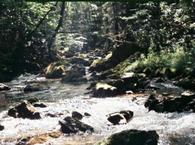
To understand what makes a stream fertile and good for more complex streamers and nymphs vs. a stream not so fertile where the simpler dry flies are more effective, please review
Class 427 Fly Fishing Good Trout Streams vs. Poor Trout Streams. This class has been written by Orvis Director of Rod and Reels Tom Rosenbauer who is an adjunct professor here at the University and who has written many good books about fly fishing.
The following tools can typically be purchased in a kit or individually.
Basic Tools -Mandatory:
Scissors – You will have to cut thread, feathers, dubbing material, etc., so scissors are a must.
Hackle Pliers – For dry flies, etc. with hackle. Hackle pliers are spring-loaded pliers that hold the tips of hackle feathers, so they can be wound around the hook shank.
Bodkin – The bodkin is like having a small hand to fit into tight places. It is used, among other things, to separate the fly’s wings, apply epoxy, and to make miscellaneous small adjustments to the fly.
Bobbin – The bobbin holds/dispenses thread from the spool. Though a simple one will work, I highly recommend the
Thread Through Bobbin, for its ease of threading, durability, and dubbing tool.
Vise – The vise clamps/holds the hook firmly throughout the duration of tying the fly. While vises can cost well into three figures, I use a very basic, inexpensive design that came with my original fly tying kit many years ago. The rotary design type of vise, though more expensive, allows the hook to turn during tying.
Hair Stacker – The hair stacker allows you to align the tips fur, cut feathers, etc., in order to tie them in ordlerly fashion on the fly, such as for the fly’s tail. Usually, this operation can be done satisfactorally without the tool, and I rarely use it.
Basic Tools - Recommended:
Whip Finisher – The whip finisher assists in tying the final knot that holds the fly together. Tying this knot is very simple with the finisher, and not so easy without it. I recommend the kind of finisher with rotating handle.
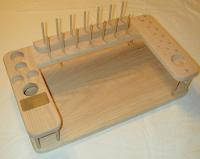
Fly Tying Desk - Often referred to as a Bench or Station stores and organizes the fly tying tools and materials, both while fly tying, and for general storage. For a simple start to fly tying, you can simply put your equipment in a box of any sort. However, as you expand your capabilities, you will likely want something more sophisticated as this picture illustrates.
Basic Materials:
For getting started fly tying, I would recommend purchasing at least the minimum materials for tying a basic dry fly. These include dry fly hooks, a spool of black thread, dubbing/wax, hackle, and duck or goose feathers. If you prefer, you may start with the basic Tying kit. However, these and more basic materials are listed and discussed individually below:
Hook – The hook should be chosen based on what type of fly (e.g. dry fly, nymph, streamer, etc.) and size you want to tie. There are different (actually, there is an endless variety of) hooks for each application. I prefer size 12-14 dry fly hooks, size 8-12 nymph hooks, and size 4-8 streamer hooks, depending on the size of the stream/fish I’m pursuing.
Thread – Start by using black waxed thread. Black will work satisfactorally with many different fly patterns, and this will allow you to get started without having to purchase (and thread through the bobbin) many different spools of thread. The wax is helpful for applying dubbing. However, I use additional wax, to achieve easier/better dubbing of the fly.
Dubbing – Dubbing is used to form the main body of many flies. It is primarily made of synthetic materials these days, and it is spun (or twisted) onto the thread, which is then wrapped around the hook shank to form the fly’s body. Gray is a versatile color to get started, for both dry flies and nymphs.
Hackle – Hackle can be purchased in the form of a hackle neck or saddle (or even a small pack of hackle feathers). I’ve traditionally used necks, simply because of cost. The long hairs from the larger feathers on the hackle neck can be used for the fly’s tail. This is one place you may want the hair stacker. Complete feathers with short hairs from the hackle neck are used to form the hackle around the head of the fly. Once wet, the hackle feathers simulate the fly’s legs. Brown (especially with a slight, reddish hue) and black are good starter colors.
Duck or Goose Feathers – Duck or goose feathers are often used for a dry fly’s wings. Mottled, white, and gray are good colors.
Bucktail – Bucktail is used on some dry flies, but it’s primarily used to form streamers’ tails. White or yellow are good colors for streamers. However, synthetic materials, such as
Super Hair, Unique Hair, and Neer Hair work better, and are better for the deer.
Marabou Feathers and Flashabou – These fluffy feathers (marabou) are used on streamers for their superior action in the current. White is a good color for streamers. They are also used on wooly buggers, usually in black or other dark colors. Flashabou is a synthetic material that has a similar function to the marabou feathers.
Tinsel, wire, bead heads, false eyes, floss – These items are used on various flies to dress them up. You probably won’t use them to get started.
Chenille – Chenille is used to form the bodies of wooly buggers and a few other flies. Black (or other dark colors) is a good color for wooly buggers.
Epoxy – Epoxy is often used on the head of the fly to secure the knot, to prevent it from unravelling. I typically use it on streamers, where the head tends to be bulky.
Sealant - Sealant is often used to seal the materials on a completed dry fly, to improve the fly’s floating.