

In this course the student will be exposed to a general discussion on strike indicators, including the 5 types of indicators , and their uses. Then the student will learn how to rig the indicators with emphasis on yarn indicators and dry fly indicators. The student is expected to have a good understanding of knots before taking this course.
This course is divided into three major segments as follows:
1.Discussion of indicators including the types and uses
2. Rigging yarn indicators with advantages and disadvantages
3. Rigging dry flies
The dry fly purist may choose to fish with terrestrial patterns or attractors, but presenting nymphs in a dead drift manner is the most reliable fishing method during these periods. For most anglers, this nymph fishing involves a strike indicator. What is a strike indicator? A strike indicator is anything that can be attached to the leader to let the waiting angler know that the drift of a sunken fly (or nearly invisible small dry fly) has been intercepted by a feeding fish. Therefore, the defining characteristics of a strike indicator are that it should float and it should be visible to the angler.
1. Do indicators spook fish? Absolutely. But for most anglers, the tradeoff in using an indicator is a positive one—for every fish scared away by the splash or shadow of an indicator, several are hooked by detecting strikes more quickly than could be done without the indicator.
2. How far from the fly should the indicator be? As with most important questions, the real answer is that it all depends. In this case, it depends on the depth of the water being fished and speed of the current. Even in an idealized situation (in which the fly would hang straight down from the indicator), the fly needs to be at least as far from the indicator as you wish the fly to be from the surface of the water. In the real world, the angler must increase this distance to allow for turbulence and slack in the leader. As a general rule, the indicator and fly to be separated one and a half to two times the depth being fished.
3. If adding split shot or other weight to the leader, how far from the fly should it be placed? Minimize added weight, and put the shot as close to the fly as possible,
Beyond these basic considerations comes the question of what kind of indicator to use. Some of the most popular and convenient — "bobber-type" indicators — come in all shapes and sizes. The other popular types include:
• Bobber
• Yarn
• Dry Fly
• Greased leader
• Sight Fishing – no indicator
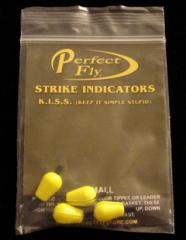
Bobber Indicators - The effectiveness of fishing with an indicator has spawned a myriad of commercial indicators. Some of the most popular are the styles scorned by some as "bobbers"—manufactured of cork, plastic or foam, they float high enough to suspend a sizable weighted nymph, and since they are made or painted with fluorescent materials, they are easy to see, even in fast, choppy water. These indicators are usually available in several colors: red or orange, chartreuse or yellow, and sometimes white. As a general rule, the red or orange shades are more visible in bright conditions, and chartreuse or yellow is more visible in low light, as on overcast days or at dusk.
Many of these styles can also be moved up and down the leader, an advantage for the angler who is fishing varying depths in the course of a day on the water. One factor to remember if the indicator is moved up and down the leader is that smaller tippet diameters sink more quickly than larger ones—if the angler puts a big Corkie at the junction of the fly line and leader butt, it will take a considerable amount of weight on the leader to pull the body of the leader down into deep, fast water.
Because of their high buoyancy and visibility, these "bobber" style indicators are the most popular for fishing fast freestone streams, but they can become a liability when fishing the smoother currents of small creeks and tailwaters. Most are oversized for these water types, and create too much shadow, both during casting and during the drift. Many of these indicators are manufactured in irregular shapes, and these shapes can be difficult to cast with any accuracy, a particular problem on small creeks and tailwaters where the fish hold in very narrow feeding lanes. The irregular shapes also tend to catch fine tippet as the casting loop unrolls, resulting in a tangled leader. Finally, the larger indicators also land with enough splash to spook fish from considerable distances.
One style of foam indicator that is popular for spring creek nymph fishing is the "roll-on" adhesive foam tape. This type of indicator works fairly well because it sidesteps the problems noted above. These indicators are pre-cut in fairly small sizes, and they can be trimmed down to even smaller sizes with scissors. Also, unlike the "pinch-on" style foam tape, these indicators form a reasonably aerodynamic shape on the leader and will allow accurate casting. They still have their problems—the color rubs off the foam too easily and the adhesive doesn't stick that well (until you try to get it off the leader when you remove the indcator)—but this is probably the best choice among these types of indicators for spring creek fishing.
Yarn Indicators - Yarn is one of the most versatile and popular materials for strike indicators. Although it requires some rigging to attach it to the leader, it is one of the best systems. The size of the indicator (i. e., the amount of yarn used) can be varied according to water type and the size of fly and amount of added weight being used. Yarn also lands softly and floats well. The best yarn for indicators is fairly coarse in texture, and macramé yarn—if you can find it in appropriate colors—works very well. Finely textured yarns (such as Glo-bug yarn) will work, but capillary action draws water into the yarn more quickly and makes it more difficult to redry the indicator once it is waterlogged. A paste flaoatant can be used to dress the yarn if necessary.
On slow moving currents, keep the indicator as small as possible while keeping it visible and buoyant enough to float the nymph attached to the tippet. Possibly the presence of a large, bright indicator will put a fish down, especially if a number of drifts are needed to get the fly in exactly the right current line.
Yellow is a good choice of color as it is easy to find and easy enough to pick out on the water, yet not so bright that it will spook the fish. However, don't be afraid to use more material or a brighter color if necessary.
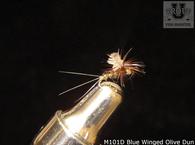
Dry Fly Indicators - Although it is probably the most traditional style of strike indicator, the use of a dry fly as an indicator has become very popular in the last decade. As long as the dry fly is visible and bouyant enough to function properly, this approach has several advantages. Even if the fish does not take the dry fly, there is little chance that it will spook the fish. This also gives the angler the opportunity to catch a fish on the indicator.
Greased Leader - One minimal "indicator" that can be useful in certain situations is to dress the leader with a paste floatant (thick silicone pastes work best), and watch the leader itself to detect a strike. While this removes the bulk of an added indicator from the leader — allowing better accuracy and a more subtle presentation of the fly — it also offers much less buoyancy and is much harder to see. It is useful for presenting a midge larva or pupa pattern on very slow currents or stillwater, especially in flat light. In these light conditions, other indicators can be very difficult to see, but the greased leader shows up as a dark line on the surface film of the water. However, in faster currents or even the slightest breeze, this approach does not provide enough flotation to work.
Sight Fishing or No Indicator - In the right conditions, one of the most effective (and certainly among the most interesting) nymph fishing techniques is to remove the indicator entirely and detect strikes by watching the fish react to the fly. Like the greased leader technique, the absence of any bulk on the leader allows for more accurate casting and creates less commotion when the fly is presented.
There are several critical ingredients in this technique. One is that the fish must be visible, so good spotting light is essential. The angler must also be able to mark the fly as it hits the water to make sure the fly is presented in the same current line as the fish. It is also important to be able to judge the sink rate of the fly, as the fly needs to be presented far enough upstream of the fish to get the fly to the fish's level.
If these prerequisites are met, the angler makes the cast and then follows the fly's progress at the speed of the current until it nears the fish. At that point, the angler's eyes shift their focus to the fish and watch for a reaction. If the fly is in exactly the right feeding lane, the fish may just open and close its mouth. The interior of the fish's mouth sometimes appears as a flash of lighter color, which is why some anglers refer to this technique as "white mouthing" the fish. Often, the fish will move slightly from side to side to intercept the nymph, and the angler can judge from the fish's body language when the fly has been taken.
Look for the fish to make a sudden stop as it intercepts the nymph, sucks it in, and turns back to its original lie. Quick reactions are essential—as soon as it detects that the fly is not food, the fish will try to eject the fly from its mouth. Even if the angler's reaction time is slow, sharp hooks will also help—if you see the fish suddenly start to shake its head back and forth, it is probably trying to get rid of a sticky sharp hook. Sight fishing requires decent vision, the right light conditions, and a fair amount of practice. However, like most subtle angling techniques, it can be a deadly way to catch fish, and a whole lot of fun.
There are several types of commercial yarn indicators that can be purchased pre-rigged and are attached to the leader by various means. However, most are too big for small creek fishing and the attachment system may weaken the leader. Here are four of the best methods to rig the yarn yourself.
Rig Yarn in Open Loop - 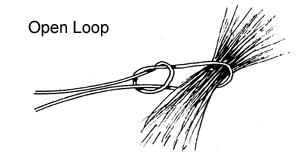
One of the most commonly seen ways to rig yarn is to place a piece of yarn in an open slip knot loop and close the slip knot down to secure the yarn in place. This method will certainly work, but it has an number of disadvantages. If the loop is kept fairly open (around a thick chunk of yarn), the yarn may fall out or be launched out during casting. If a smaller piece of yarn is used, and the loop is drawn up tight, the leader will be kinked in the process. This is a particular problem with the larger diameters in the butt sections of copolymer knotless leaders. This method is quick and simple when the yarn is first rigged, but the resulting pigtail in the leader makes accurate casting nearly impossible and renders the leader useless for other fishing.
Rig Yarn at End of Leader, Tippet at Right Angles - 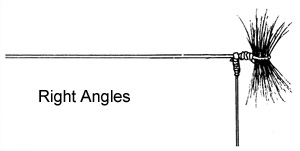
A very efficient way to rig yarn for nymph fishing is to clinch knot the yarn at the end of fairly short, coarse leader (7 1/2 to 9' with a tippet of 3X-4X) and then attach the actual tippet to be used by clinch knotting it around the standing end of the leader. This results in a tippet that comes off the leader at a right angle, which allows the fly to penetrate the surface film and sink quickly to fishing depth. This is one method that can be used to rig a big gob of yarn, if the angler is trying a suspend a bigger nymph in fast water. The biggest disadvantage to this method is that it produces a leader that must be changed or completely rebuilt for dry fly fishing, and this can be frustrating when the fish switch quickly from nymphs to emergers or duns in the course of a hatch.
Attach Yarn With Second Piece of Tippet Material - 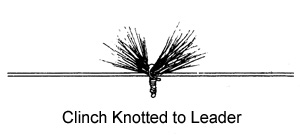
Another simple and effective way to attach yarn to the leader is to clinch knot a separate piece of monofilament around both the yarn and the leader. 3X or 4X material is easy to work with and strong enough to allow the knot to be drawn tight without fear of breakage, yet it doesn't create unnecessary bulk. After the knot is tightened and trimmed, the yarn assembly can be moved up and down the leader. However, this method works best if the yarn is jammed against the tippet knot, as this helps keeps the yarn from moving accidentally, and changing the depth of the presentation. One advantage of this system is that the yarn and extra monofilament can be cut off to allow a quick change from nymph to emerger or dry fly, as long as the angler is careful not to cut the tippet in the process.
Rig with Back-to-Back Uni Knot - 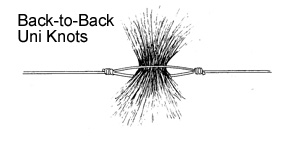
A grest way to rig yarn for small creek fishing was inspired by a diagram—seen 15 or 20 years ago—of yarn being inserted in a blood knot as the tippet is attached to the leader. However, this adds an extra maneuver and even experienced anglers struggle enough with blood knots that inserting the yarn can be a daunting task. A variation on this theme is to use a back-to-back Uni knot as the tippet knot, rather than a blood knot. The knot is easy to tie (and provides a nice, big gap in which to insert the yarn before the knots are drawn together), and the yarn is held securely in place. Best of all, the switch from nymph fishing to dry fly fishing is simple and quick. Grabbing the yarn between thumb and forefinger and pulling will separate the knots just enough to allow the yarn to slide out. The knot can be retightened (and retested), the fly changed, and the angler is set to go.
Using a dry fly as the indicator require a rigging method that connects the two flies securely to the leader and to one another. Since an advantage of using two flies is that the "indicator" fly will also catch fish, the rigging method should also maximize the hooking potential of the top fly. Although in most cases, the combination of flies will be an indicator dry fly with a nymph suspended below, a more visible dry fly can also be used to help detect a smaller dry fly or emerger on the point. Finally, even though the "indicator" is lost, the rigging methods described can also be used for attaching two nymphs to the leader.
Connecting the Dropper or “Point” Fly to the Bend of the Hook of the Top Fly - Clinch knotting a piece of tippet and the dropper fly to the bend of the hook on the top fly provides a strong connection between the two flies, and it is the method employed most often by recent converts to the "two fly" approach. Since the flotation in most dry fly designs (collar hackles, deer and elk hair wings, and clipped hair heads, for example) is concentrated at the head end of the fly, the weight of the dropper fly will tend to pull the rear end of the indicator fly through the surface film.
This can make the indicator fly harder to see, but in situations where the top fly is best presented as an emerger, it can also be a deadly technique. A great combination in a caddis hatch is an Elk Hair Caddis on top fly with a soft hackle emerger on the dropper. I usually trim the hackle and wing on the Elk Hair Caddis to get the fly to sit low, which results in a two emerger presentation—one in the surface film and one a few inches below the surface. An X-Caddis also works well as the top fly in this rig.
Connecting the Dropper or “Point Fly” to the Eye of the Top Fly - Another way to connect two flies is to tie the tippet for the dropper fly to the eye of the top fly, rather than the bend. Although fitting two clinch knots on the eye of a fly can be a chore if the fly is small, this tends to preserve the floating angle of the indicator fly. It also keeps the tippet away from the gape of the top fly to prevent any hooking problems with the top fly. I don't think it is common, but tying to the bend of the top fly may occasionally interfere with hooking.
Traditional Blood Knot Dropper - It is common to use a blood knot for attaching tippets (except when rigging yarn as described above), one of my best ways to rig two flies is still the most traditional—a blood knot dropper. By leaving one right angle tag end untrimmed, the top fly can be attached to this dropper and the dropper fly attached to the end of the tippet.
Make sure to leave the dropper tag end long enough that you don't have to struggle to tie the clinch knot to attach the fly. On the other hand, leaving the tag too long will invite tangling of the dropper around the leader. I usually leave 5-6" to work with, and try to have the fly about 2-3" from the leader after it is attached to the tag. Make sure the dropper tag is from the larger of the two diameters you are connecting. The stiffness of the thicker material will help keep the dropper at right angles and minimize tangling.
NOTE: This class is a reprint from MidCurrent.
Experiment with these methods, and see which ones are most productive for you. You may find that certain rigging methods work best in specific situations, and knowing several different rigs will be advantageous.
Review Top Nymphing Tactics to Fly Fish for Trout to gain insight on the proper use of a dropper.
Note: Class material first appeared in MidCurrent. For more relevent information about fishing, check out this site.
Further review of knot applications at Killroys.