#1 Seek to Improve
The first and most important thing you can do to improve your photos is to make a conscious effort to take good photos. Stop simply snapping away, and instead look critically at what you are turning out. Do your shots end up on the wall at home, or in a shoebox? Anyone can take high-quality fishing photos, especially in this era of digital photography, but it takes a certain amount of what my old coaches always called “want to.”
If you know someone who can provide you with the technical insights you lack into composition and camera science, approach that person. When I did, I also gained a partner who would work with me and approach things from a different stylistic place. Together, we were able to improve beyond where either of us would have been on our own — not to mention having someone there to just push the shutter button when an idea occurred!
#2 Learn Composition
Composition is the most critical element of photography. It helps to know a few basic rules — the Rule of Thirds, for instance. The Rule of Thirds is based on old principles like those the Greeks used to design their temples: imagine a tic-tac-toe board on your image, and place the point of interest on one of the points of intersection of the board lines. Most cameras have a grid option that aids this considerably. Of course, the old cliché that rules are made to be broken applies: if you see a better angle than the one the photo manual says to us, take it. Photography, for the most part, is straightforward and simple at its best. Seek out artistic lighting and interesting subjects, and remember, your audience is always much more interested in what you are photographing than in how you photograph it.
#3 Approach Your Subject
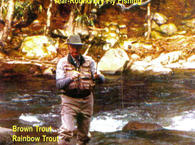
The best photography shows the viewer the world as they wish they could see it — not what they would actually see. Think about going to a baseball game. Sure, you can get a lot of enjoyment out of watching A-Rod from the stands. But would you want to see the same perspective on the cover of Sports Illustrated? No. You pick up a magazine because you can see a person up close and personal — you want to be able to not just read the man’s number, but count the stitches on his uniform. The same principle applies to outdoor photography, especially of other flyfishermen and of fish. The worst thing a photographer trying to get a great fish shot can do is line up their subject in the middle of the image and snap away with a field of view that shows the entire river. When you get home, you’ll wonder what all the fuss was about. Flip that camera around to vertical and get up in your subject’s face. Fill your available space, and if necessary let some of the less critical stuff leak over the edges. Don’t be afraid to push right in there — your friend will thank you for it later.
#4 Macro for Bugs and Fishes
Speaking of approaching the subject, the best way to get truly good fish and bug shots — or shots of anything small, really, is to take advantage of your Macro feature. Macro is a camera setting on most point and shoots, and special macro lenses exist for DSLRs (although, perversely, Nikon calls theirs "Micro-Nikkors"). True macro photography renders the subject life-sized on the film or sensor. Of course, this means that when that image is blown up to the normal viewing size of, say, 8 x 10 inches, that little object is greatly magnified. This is the beauty of macro — you can see things you’d never see in person and view the world from a whole new perspective. Most cameras have a "Flower" setting which activates the macro feature set. Try it out and experiment to see what you get.
#5 Light and Fill Flash
All professionals know how to compose an image. All of them photograph interesting subjects. Only the most successful truly master the techniques of dealing with light. Lighting is the area professionals worry the about most, because it impacts so many things. The light you work in affects your available depth of field, motion blur, the ability to make slow-water shots, saturation, contrast, sharpness — basically everything you can ask a camera to do. This is why pros spend so much money on f/2.8 aperture lenses — so they can gather more light.
One of the most important things is being there at the right time. Unfortunately, in most circumstances, this means getting up early. Once you’ve given Nature her chance to show her stuff, you do what you can to fit your subject material into the tapestry she’s provided. Some days that tapestry can’t be helped — such as in high, bright light at altitude. In these situations, you need to use fill flash. As a matter of fact, with a modern DSLR camera, you’re safe leaving your flash on and metering all the time. Those cameras can light the flash just enough to turn out the best possible image, so trust your camera’s meter.
Of all the money you can spend in photography, two things are the most crucial: a digital camera, and a good flash. The advantages of digital cameras are legion; the ability to review images alone is single-handedly improving photography on a global scale. Modern flash technology is right behind that in importance. Need to light a buddy under his cap? Use fill flash. Want to add some color back to that silvery fish? Angle it carefully so the light isn’t broad-sided back, and use fill flash. Want to see more details in the fur of that elk standing over there? Hammer out some light with your flash.
#6 Tripods
There are many situations in which carrying a tripod just isn’t practical, such as on hike-in fishing trips or on open water in a boat. Whenever it can feasibly be done, however, bring along the tripod. Invest in a sturdy set of legs and at least a light ball head. Ball head tripod mounts, which allow you to easily move your camera in 3-D, will quickly become indispensable to you.
Why do you need a tripod? Simple: so you can take the slowest shot possible. In any given situation, a great rule of thumb is to take the longest exposure you can get away with. Why? Long exposures improve color saturation and show the natural world in a way you may not be able to mimic in a short snap. Long exposures, however, introduce several problems. The first is that there’s a lot of light in bright daylight. Use filters to cut light for longer exposures in bright sun. The second is, they introduce shake and subject blur. Subject blur is just a reality — when photographing fish, for instance, simply take a lot of pictures to get one where it holds still. Most people just don’t have the stability to hold in a shot much longer than 1/20s without introducing camera shake.
#7 Low Light and Fast Water
Tripods also let you get those fantastic slow-water shots you see in magazines. The recipe here is pretty simple, really. First, set a long exposure, first. Second, use filters, stacked if necessary, to cut light on a bright day. Use a tripod, third. And last, set your flash for rear-curtain sync and fill flash your subject, just a little.
Long exposures give water time to run and flow, overlapping itself on the exposure and making for a slick, cotton-like effect. However, a long exposure also allows a lot of light to reach the lens, so you need to cut it with filters (a circular polarizer at a minimum), and set a high aperture like f/22. A tripod will keep you from shaking, but it’s also important that you use things like remote shutter triggers to keep from whacking the image from the get-go. Also, it helps to have a model who’s willing to stand still like he was at gunpoint! Dress your model in darker colors, if you can, as well – grays, tans, and greens tend to blow out, or over brighten, when exposed for too long. Personally, I prefer a deep red.
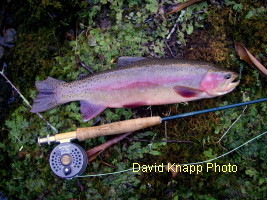
#8 The Fish Shot
The fish shot is the moment of truth for most would-be outdoor photographers. Magazine sales numbers show that anglers want to see big fish. Period. If you happen to be the photographer on hand when a lunker is landed, you have an immediate opportunity to make a salable picture, so long as you don’t blow it. Here’s how I do it.
First off, talk to your fisherman. The number one thing he needs to know, in our sport of dedicated catch and release anglers, is that you are not going to kill the fish. Properly handled, any trout can survive a decently-long photo session. I said properly handled, mind you. When your angler lands his fish, keep it in the water and get it in a net. I paid to have a photographable net, a nice looking wooden one, because I knew the net would make the shot whether I liked it or not (and it has since been in American Angler several times). Have your fisherman suspend the net rim out of the water while leaving the fish in the bag as you get set up.
If you have a tripod, use it. Set up your flash, get your camera turned on and ready to go. Then, get your fisherman set up. I tend to like him kneeling or sitting in the water rather than stooping — it adds perspective to the fish and keeps faces normal, not to mention being more comfortable. Take off sunglasses and hide ostentatious logos where possible. Keep the rod in the picture, and the fly in the fish’s mouth, and get yourself to a low angle.
When the time comes, simply say ‘now,’ and let the angler lift the fish out of the net. Have him angle it slightly so the head is closer to the camera than the body (a better optical trick than the arms-length grip and grin, since it forces the eye to assume perspective length). Snap off a few shots, then have the angler return the fish to the net. Review your images. If they are what you want, let the fish go. If not, repeat the process.
#9 Insurance
I don’t believe a camera that spends its time in the waterproof boat bag is worth having along, so I always carry mine on my shoulder, easily accessible. Because it is almost inevitable that my camera will eventually take a dunking, I invested in a personal articles policy with my insurer. For about $15 a month, I have enough coverage to replace all the gear I own, including all my fishing equipment.
#10 Choice of Camera
Which camera is right for me? If vest space is an issue, I recommend Pentax’s excellent Optio Waterproof series. These cameras are small, waterproof, and high quality. They are designed for the amateur and are built to be idiot-proof. They also pack high quality digital sensors that will easily make a wall-mountable photograph. In experienced hands, they can make publishable images.
For the more ambitious photographer on a budget, I recommend the Nikon D50 or its Canon Digital Rebel equivalent. Your best bets are the industry leaders, Nikon and Canon, and I strongly recommend choosing one of these two brands. The Nikon D50 is a digital SLR camera like you might have used ten years ago. It accepts interchangeable lenses, professional flashes, and is capable of technical image-making the point and shoots just can’t match. At under $800 with a lens, it’s also about the most affordable quality DLSR on the market.
NOTE: This classs taken with permission from an article in Mid Current by Zach Matthews. To learn more about Zach and his wife Lauren's photography, go to Friends of TroutU and scroll down to Itinerant Angler.